


Lighting can make or break your product renders—especially in Blender, where realism and visual appeal matter more than ever. One of the most essential lighting techniques for professional-grade product rendering is the 3-point lighting setup. Whether you’re showcasing a supplement jar, tech gadget, or luxury item, mastering this technique can dramatically enhance your render quality and viewer engagement.
In this blog, we’ll break down what 3-point lighting is, how it influences the look and feel of your product, and how to implement it effectively in Blender.
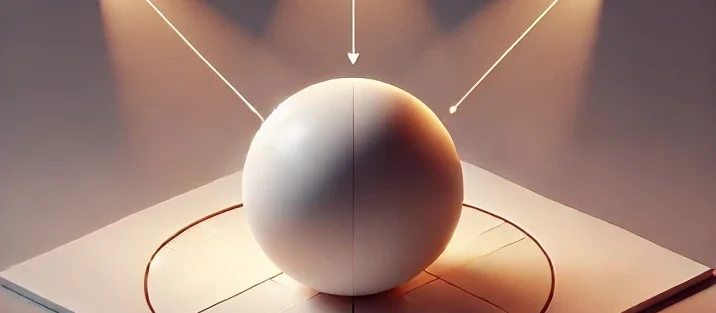
What Is 3-Point Lighting?
The 3-point lighting system is a classic lighting setup used in photography, cinematography, and 3D rendering. It consists of three primary lights:
-
Key Light – The main source of illumination. It defines the shape and form of the product.
-
Fill Light – A softer light placed on the opposite side of the key light to reduce harsh shadows and add depth.
-
Back Light (or Rim Light) – Positioned behind the object, it creates separation from the background and enhances the product’s outline.

Why Is 3-Point Lighting Important in Product Rendering?
1. Adds Depth and Dimension
Without proper lighting, renders can look flat and unconvincing. The key and fill lights work together to highlight the contours and edges of a product, giving it a sense of volume and realism. This is particularly effective when rendering products with curves or textures like essential oil bottles or shilajit jars.
2. Enhances Material Definition
Lighting reveals how light interacts with a product’s surface—metal, glass, plastic, or matte. A well-placed rim light, for example, makes a soda can look crisp by emphasizing its reflective edges, while the fill light helps prevent important details from getting lost in shadows.
3. Improves Focus and Visual Hierarchy
The 3-point setup helps direct the viewer’s attention exactly where you want it—usually to the logo, label, or product texture. By adjusting intensity and color temperature, you can make specific product features pop without distractions from the background.
4. Supports a Natural Look
This lighting system mimics real-world lighting conditions, which is crucial for lifestyle or nature-inspired renders. For example, a supplement jar lying down in a natural scene will look much more believable when lit in a way that reflects how it would appear outdoors.
How to Set Up 3-Point Lighting in Blender
-
Add a Key Light
Place this light at a 45-degree angle from the front of your product. Use a spotlight or area light depending on your desired shadow softness. This light should be the brightest. -
Add a Fill Light
Place it on the opposite side of the key light, slightly lower. Reduce its intensity to about half (or less) of the key light. This avoids overly flattening the shadows and keeps the contrast subtle. -
Add a Back Light (Rim Light)
Position it behind and slightly above the product, angled toward its back edge. This light adds a glow or rim effect that outlines the product and helps separate it from the background. -
Fine-Tune
Adjust each light’s strength, color, and position until your product looks balanced. Use Blender’s Render Preview to test different looks before finalizing.
Tips for Better 3-Point Lighting in Blender
-
Use HDRIs for Ambient Light: For a more natural and soft fill, combine your 3-point setup with an HDRI environment map.
-
Color Temperature Matters: Warm key lights and cool rim lights can add professional contrast and mood.
-
Use Light Falloff: Blender lets you control how light diminishes with distance. Use this to focus attention and reduce overexposure.
Final Thoughts
The 3-point lighting technique is a powerful tool in any Blender artist’s workflow. When done correctly, it elevates the realism, professionalism, and impact of your product renders. Whether you’re working on clean studio shots or immersive lifestyle scenes, like flavored water renders with fruit backgrounds or scented candle setups, mastering lighting is non-negotiable.
Start experimenting with 3-point lighting in Blender today, and take your product visuals to the next level.